

Scheduling the Job's Next Billing
The Set Next Billing shortcut lets AEs schedule a job’s next billing, as well as assign it to billing person to get the invoice done on time.


📌 Creatives need Jobr to see what clients want now. Great design is easy. Managing people, projects, expectations, and deadlines is hard. You may have gotten into this business because you're an artist, but as soon as you land your first big gig, you'll find yourself in a much different role: project manager. Jobr makes managing projects fast and easy.
💡 Try Jobr, love Jobr
The Set Next Billing shortcut lets AEs communicate to the accounting department about a future job billing. It's essentially an accounting memo with billing instructions. When an AE things the job is ready for billing, they pick an invoice date, choose the type of billing (e.g., estimate, progress, etc.) and the billing amount which is emailed to accounting.
The shortcut doesn't actually add the invoice into Accounts Receivable. That's still done by an accounting department staff member who is the designed "biller" for the job. The biller can be anyone with user permissions to add A/R invoices and is chosen by the AE when they schedule the next job billing. The "biller" staff member sees their scheduled job billings on their Job Billing Worksheet. (They also appear the Production Calendar to that anyone in production/traffic to see as well.)
Account execs and project managers can set a job's next billing here:
👉 Job Tickets when you need to schedule one job's next billing
👉 Media Jobs when you need to schedule a media job's next billing
👉 AE Project Status Report when you need to schedule next billings for multiple jobs
✳️ Estimate billing will bill every job task that has an estimate using the percentage or the flat amount you entered.
✳️ Progress billing will bill every job task that has an unbilled cost amount. The set task billing amounts option lets you select one or more specific job tasks to be billed for their unbilled amounts.
✳️ Final billing will bill every job task that has an unbilled cost amount. The set task billing amounts option lets you select one or more specific job tasks to be billed for their unbilled amounts.
✳️ Cost/WIP/Phase billing will bill job costs for a range of dates for any job task with unbilled costs. In addition, you can filter costs to be billed for a selected phase (e.g., concept, draft, final approval, etc.).
✳️ Advance billing will bill an advance against a job's future costs. Advances will be applied as payments to subsequent job billings.
📎 For all billing types the AE can enter to a flat billing amount. For estimate, progress, or final billings, however, the AE has an option to split the billing amount up between tasks. The set task billing amounts option (see below) lets them decide which specific job tasks will be billed for how much, including hours billed.
🔹 To schedule a job's next billing, open the Job Tickets window, click on the AE Job Snapshot tab, then click on the set next billing button.
HERE'S HOW IT WORKS
• AEs schedule next billings as a reminder to the accounting department
• Scheduled next billings aren't required
• This doesn't actually add the invoices; it's just an FYI to accounting
• Anyone with access to jobs can schedule a next billings
• Anyone who can add billings can be chosen as job's biller (i.e., to be billed by)
• You can schedule a job's next billing for any staffer that can add A/Rs
• AEs can choose to bill a flat amount or split the billing amount up between tasks.
• Estimate, progress, and final billings have an option to enter task-by-task bill amounts.
• Optional billing instructions can be included in the notification email to explain how the biller should handle a job billing
• The Notify now option will send an email to the biller immediately.
• The Bill Now option lets you add your own scheduled next billings.
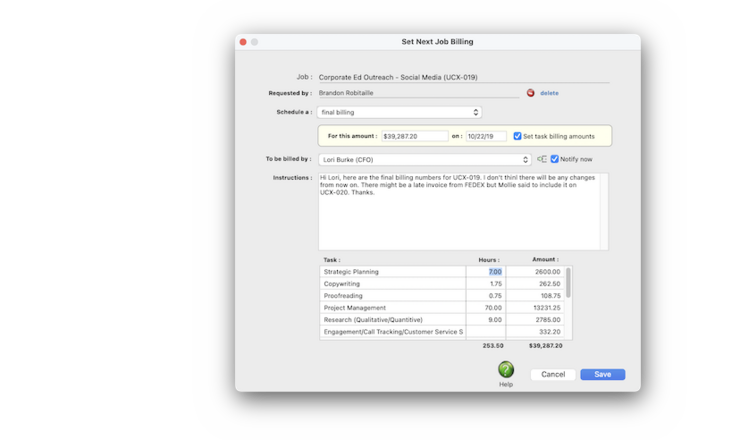
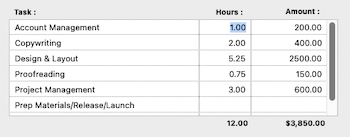
By default, the billing amount you schedule is equally spread across the job's billable tasks. But you can use the Set Task Billing Amounts option to tailor the amounts billed on job tasks. When enabled, you'll see a list of the job's billable tasks and the default billing amounts (including hours, if there are any) for them. These amounts are editable and will be copied to the job billing when it is added.
💬 Who is a biller? Any staff member with user access to Accounts Receivable and can add invoices can be a biller. The job's AEs can choose from a list of billers when they schedule a job's next billing. The biller will get an email notification when the job billing is scheduled — using the Notify Now option — then again on the billing date. (That's because Clients x Profits automatically looks for the day's scheduled next job billings and sends reminders every morning.)
Listen to a podcast about how to get the most out of Clients & Profits's most useful project management features (5:06 mins)
2️⃣ Look for the set next billing link, then click on it.
3️⃣ Choose a next billing type from the schedule a pop-up menu, then enter the amount(s).
👉 Set task billing amounts. You can allocate the billing amount among the job's tasks for estimate, progress, and final billings, including hours. To allocate to job tasks, click the set task billing amounts checkbox then enter the hours & billing amounts between the job tasks as needed.
4️⃣ Choose a biller (i.e., the staff member who will add, proof & print the invoice) from the to be billed by pop-up menu.
👉 Click notify now if you want to email this scheduled next billing to the biller when it is saved.
5️⃣ Enter the next billing’s special instructions to fully explain how to do this billing.
6️⃣ Enter the next billing’s instructions.
7️⃣ Click Save.
2️⃣ Look for the set next billing link, then click on it.
3️⃣ Choose a next billing type from the schedule a pop-up menu, then enter the amount(s).
👉 Set task billing amounts. You can allocate the billing amount among the job's tasks for estimate, progress, and final billings, including hours. To allocate to job tasks, click the set task billing amounts checkbox then enter the hours & billing amounts between the job tasks as needed.
4️⃣ Choose a biller (i.e., the staff member who will add, proof & print the invoice) from the to be billed by pop-up menu.
👉 Click notify now if you want to email this scheduled next billing to the biller when it is saved.
5️⃣ Enter the next billing’s special instructions to fully explain how to do this billing.
6️⃣ Enter the next billing’s instructions.
7️⃣ Click Save.
2️⃣ Look for the set next billing link, then click on it.
3️⃣ Choose a next billing type from the schedule a pop-up menu, then enter the amount(s).
👉 Set task billing amounts. You can allocate the billing amount among the job's tasks for estimate, progress, and final billings, including hours. To allocate to job tasks, click the set task billing amounts checkbox then enter the hours & billing amounts between the job tasks as needed.
4️⃣ Choose a biller (i.e., the staff member who will add, proof & print the invoice) from the to be billed by pop-up menu.
👉 Click notify now if you want to email this scheduled next billing to the biller when it is saved.
5️⃣ Enter the next billing’s special instructions to fully explain how to do this billing.
6️⃣ Enter the next billing’s instructions.
7️⃣ Click Save.
2️⃣ Look for the set next billing link, then click on it.
3️⃣ Choose a next billing type from the schedule a pop-up menu, then enter the amount(s).
👉 Set task billing amounts. You can allocate the billing amount among the job's tasks for estimate, progress, and final billings, including hours. To allocate to job tasks, click the set task billing amounts checkbox then enter the hours & billing amounts between the job tasks as needed.

4️⃣ Choose a biller (i.e., the staff member who will add, proof & print the invoice) from the to be billed by pop-up menu.
👉 Click notify now if you want to email this scheduled next billing to the biller when it is saved.
5️⃣ Enter the next billing’s special instructions to fully explain how to do this billing.
6️⃣ Enter the next billing’s instructions.
7️⃣ Click Save.
2️⃣ Look for the set next billing link, then click on it.
3️⃣ Choose a next billing type from the schedule a pop-up menu, then enter the amount(s).
👉 Set task billing amounts. You can allocate the billing amount among the job's tasks for estimate, progress, and final billings, including hours. To allocate to job tasks, click the set task billing amounts checkbox then enter the hours & billing amounts between the job tasks as needed.
4️⃣ Choose a biller (i.e., the staff member who will add, proof & print the invoice) from the to be billed by pop-up menu.
👉 Click notify now if you want to email this scheduled next billing to the biller when it is saved.
5️⃣ Enter the next billing’s special instructions to fully explain how to do this billing.
6️⃣ Enter the next billing’s instructions.
7️⃣ Click Save.
2️⃣ Look for the set next billing link, then click on it.
3️⃣ Choose a next billing type from the schedule a pop-up menu, then enter the amount(s).
👉 Set task billing amounts. You can allocate the billing amount among the job's tasks for estimate, progress, and final billings, including hours. To allocate to job tasks, click the set task billing amounts checkbox then enter the hours & billing amounts between the job tasks as needed.
4️⃣ Choose a biller (i.e., the staff member who will add, proof & print the invoice) from the to be billed by pop-up menu.
👉 Click notify now if you want to email this scheduled next billing to the biller when it is saved.
5️⃣ Enter the next billing’s special instructions to fully explain how to do this billing.
6️⃣ Enter the next billing’s instructions.
7️⃣ Click Save.
2️⃣ Look for the set next billing link, then click on it.
3️⃣ Choose a next billing type from the schedule a pop-up menu, then enter the amount(s).
👉 Set task billing amounts. You can allocate the billing amount among the job's tasks for estimate, progress, and final billings, including hours. To allocate to job tasks, click the set task billing amounts checkbox then enter the hours & billing amounts between the job tasks as needed.
4️⃣ Choose a biller (i.e., the staff member who will add, proof & print the invoice) from the to be billed by pop-up menu.
👉 Click notify now if you want to email this scheduled next billing to the biller when it is saved.
5️⃣ Enter the next billing’s special instructions to fully explain how to do this billing.
6️⃣ Enter the next billing’s instructions.
7️⃣ Click Save.
⚠️ Remember, a scheduled job next billing is just a set of instructions —- it doesn’t affect the job summaries, A/R, or the accounting system at all. That happens when the biller adds the invoice and posts it.
There are two ways to see upcoming scheduled job billings:
👉 The Job Billing Worksheet This window shows all jobs that are scheduled to be billed. Jobs are sorted by the scheduled next billing date. You can then add job billings directly from this window.
👉 The Production Calendar This shows scheduled next job billings. To only show scheduled next billing, pop-up menu. Double-clicking on a job next billing will displays its instructions. For accountability reason, you can edit your own scheduled next billings, but you can’t change those added by other staff members.
This shows scheduled next job billings. To only show scheduled next billing, pop-up menu. Double-clicking on a job next billing will displays its instructions. For accountability reason, you can edit your own scheduled next billings, but you can’t change those added by other staff members.

This shows scheduled next job billings. To only show scheduled next billing, choose pop-up menu. Double-clicking on a job next billing will displays its instructions. For accountability reason, you can edit your own scheduled next billings, but you can’t change those added by other staff members.
⚠️ The Bill Now shortcut only appears for your scheduled next billings.u> You can't bill the next billings scheduled by other staff members.
TIPS
📌 Job status has no effect on scheduling next billings.
📌 A fee-based job that's billed by another job can't be schedule for a next billing because a fee-based job is never billed on its own.
FAQs
💬 Do I have to be an AE or a project manager to schedule a job's next billing? No. Anyone with access to jobs can schedule a job’s next billing. Even if a staff member doesn’t have access to Accounts Receivable, they can still schedule a next billing — that’s because they’re not actually adding the invoice, they’re just setting up a reminder to bill a job.
💬 Do I have to clear out scheduled next job billings? No. When the job's invoice is posted, if the invoice date is the same as the next billing date then the amount is cleared; if not, you'll need to delete it yourself (or just ignore it, since it doesn't affect anything going forward).
💬 My job is currently overbilled. What happens if I schedule a next job billing? You cna, but the next billing amount will be a credit unless you change it.
💬 Can I change the billing type on a saved next scheduled job billing? No. In this case the scheduled next billing will need to be deleted then added again.
SEE ALSO
Production Calendar
AE Project Status
Job Billing Worksheet
EXPLAINERS
Job Billing Steps, Explained


© 2026 Clients & Profits, Inc.