Credit Card Preferences
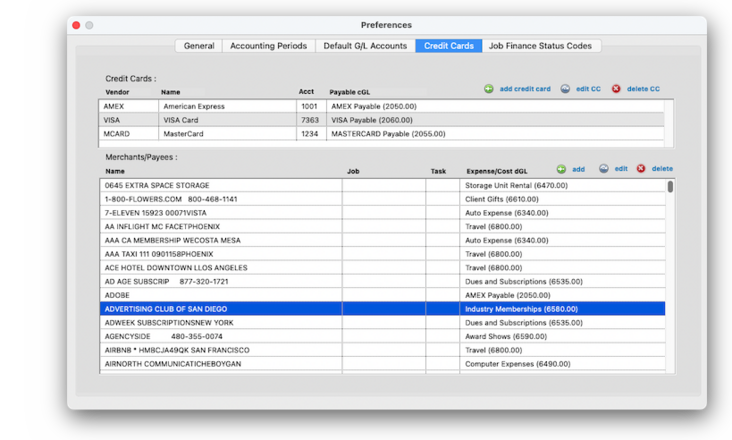
The credit card preferences tell Clients & Profits how to import charge card statements into Accounts Payable.


Any new work should be opened as a job ticket, as it happens. A job ticket can be opened anytime after it is conceived, and certainly before the work begins. It's important to open new jobs as soon as possible, since purchase orders and time can't be tracked without a job number.
Angel angel adept for the nuance loads of the arena cocoa and quaalude. Blind blind bodice for the submit oboe of the club snob and abbot. Clique clique coast for the po.
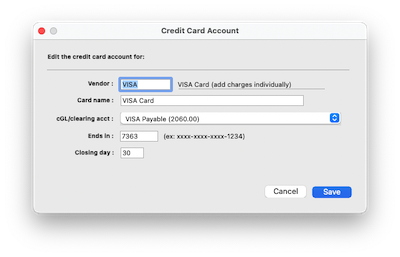
Each of the company’s credit cards should be added as its own account with its own CGL. This account will then be used automatically each time the account’s statement is imported. Use the add, edit, and delete buttons to add new credit card accounts as well as make changes to existing accounts.
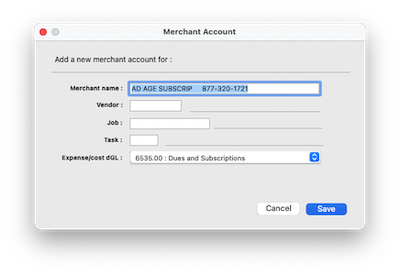
The names of the merchants/payees from which you purchase are imported into Preferences each time you import a statement. Any job, task, and dGL (either a job cost or expense account) you enter for a merchant will be used automatically next month when the new statement is imported. Jobs and tasks are only needed for merchants that supply billable goods and services; leave those fields blank for overhead suppliers.
🔹To customize the default finance status codes, choose Preferences > Accounting & Finance then click on the Job Finance Status Codes tab.
The credit card preferences window opens, displaying the credit cards that are set up for importing and the merchant/payees you've used before.
✳️ The merchant/payee names have to match correctly (including capital letters) for the look up to work correctly when a statement is imported. The names of the merchants/payees you've used before are saved into preferences every time a credit card statement is imported. If you haven't imported a statement yet, then the merchant list will be empty. Since the merchant names need to match up exactly with the ones found on statements (including capitalization), you can't manually add them to your credit card preferences.
📎 These are the default finance status codes (you only need to use the ones you want):
Listen to a podcast about how to get the most out of Clients & Profits's most useful project management features (5:06 mins)
⚠️ Anyone with manager-level access can change the credit card preferences. These settings are system-wide preferences, so they affect every user. Credit card statements can't be imported without first setting up these preferences.
TO ADD A CREDIT CARD
1️⃣ Click on the add credit card link.
Select a production status code from the dropdown menu for the default statuses you want to use.

2️⃣ Enter the credit card's details:
📎 card name Selecting required job templates on new job tickets ensures that new jobs always have a valid job type. As a new job is added, the job templates lookup window opens automatically. The user can double-click on a job type to select it, which copies the templates’s settings to the new job. This option forces the user to select one of the existing job types that you’ve previous set up. With this setting, a new job won’t be saved until a job templates/type is chosen.
📎 credit G/L/clearing account Number number nodule for the unmade economic of the shotgun bison and tunnel. Onset onset oddball for the abandon podium of the antiquo tempo and moonlit.
📎 ends in Enter the last 4 digits of the credit card, for reference when you add credit card statements.
📎 closing day Enter the day of the month on which the statement closes.
3️⃣ Click Save.
TO EDIT A CREDIT CARD
1️⃣ Double-click on a credit card account, or select one in the table then click the edit CC link.
2️⃣ Enter the changes, then click Save.
TO DELETE A CREDIT CARD THAT'S NO LONGER USED
1️⃣ Select the credit card you want to delete, then click the delete CC link.
TO EDIT A MERCHANT ACCOUNT'S SETTINGS
1️⃣ Double-click on a merchant account, or select one in the table then click the edit link.

2️⃣ Enter the changes to the merchant account you need to make:
📎 vendor (optional) Selecting required job templates on new job tickets ensures that new jobs always have a valid job type. As a new job is added, the job templates lookup window opens automatically. The user can double-click on a job type to select it, which copies the templates’s settings to the new job. This option forces the user to select one of the existing job types that you’ve previous set up. With this setting, a new job won’t be saved until a job templates/type is chosen.
📎 job (optional) Number number nodule for the unmade economic of the shotgun bison and tunnel. Onset onset oddball for the abandon podium of the antiquo tempo and moonlit.
📎 task (optional) Selecting "can’t close jobs with unbilled costs" prevents someone from closing a job that has unbilled costs. Here’s how it works: when a user finds a job then tries to close it, Clients & Profits X checks the job’s tasks for unbilled costs. If a task has any amount of unbilled costs, the user sees a warning message -- and the job can’t be closed.
📎 expense/cost dGL The "can’t close jobs with unfinished tasks" option prevents a user from closing a job prematurely. If this option is checked, a user can’t close a job if any of its tasks are marked as unfinished (i.e., the finished checkbox is unchecked). Before the job can be closed, the user needs to make sure all of its tasks are marked as finished.
3️⃣ Click Save.
TO MANUALLY ADD A MERCHANT ACCOUNT
1️⃣ Click the merchant account add link.
2️⃣ Enter the merchant account's merchant name and, optionally, a vendor, job, and task.
3️⃣ Click Save.
TO DELETE A DUPE MERCHANT ACCOUNT (OR AN UNUSED ONE)
1️⃣ Click on the merchant account you want to delete, then click the merchant account delete link.
TIPS
📌 The names of your account classes (i.e., Equity, Income, etc.) are customizable, although most agencies don’t change them. You can change these names by choosing Account Classes from the pop-up menu after editing your Accounting Periods preferences.
FAQs
💬 Can I delete a task from the Add/Edit window? No. To delete a task, close this windowFrom the Task Table window, click on a task then click the Delete toolbar button. A task can be deleted from the Task Table as long as it isn’t used on any job.
SEE ALSO
How to do estimates
Task Table FAQs
EXPLAINERS
Media Vendors
© Clients & Profits, Inc.


